
100W 12V Shed Solar Wiring Diagram Printable (1S1P)
Computed 100W 12V shed solar diagram: 1S1P array, wire gauges, OCPD, battery arrangement, routed parts and printable files.
View the scalable diagram inline
What this computed plan shows
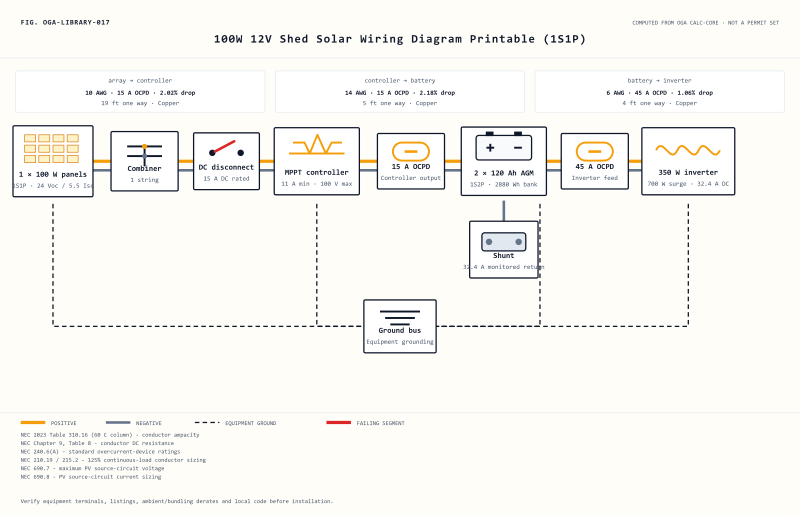
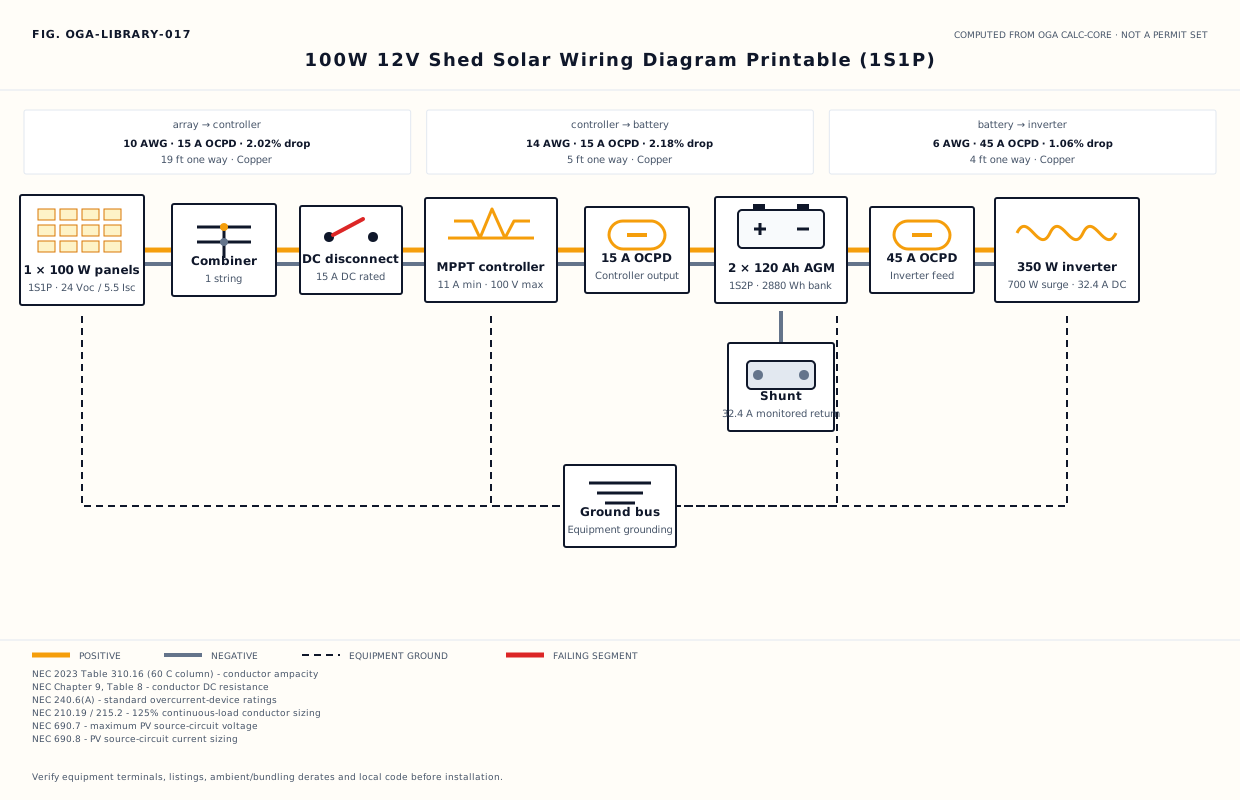
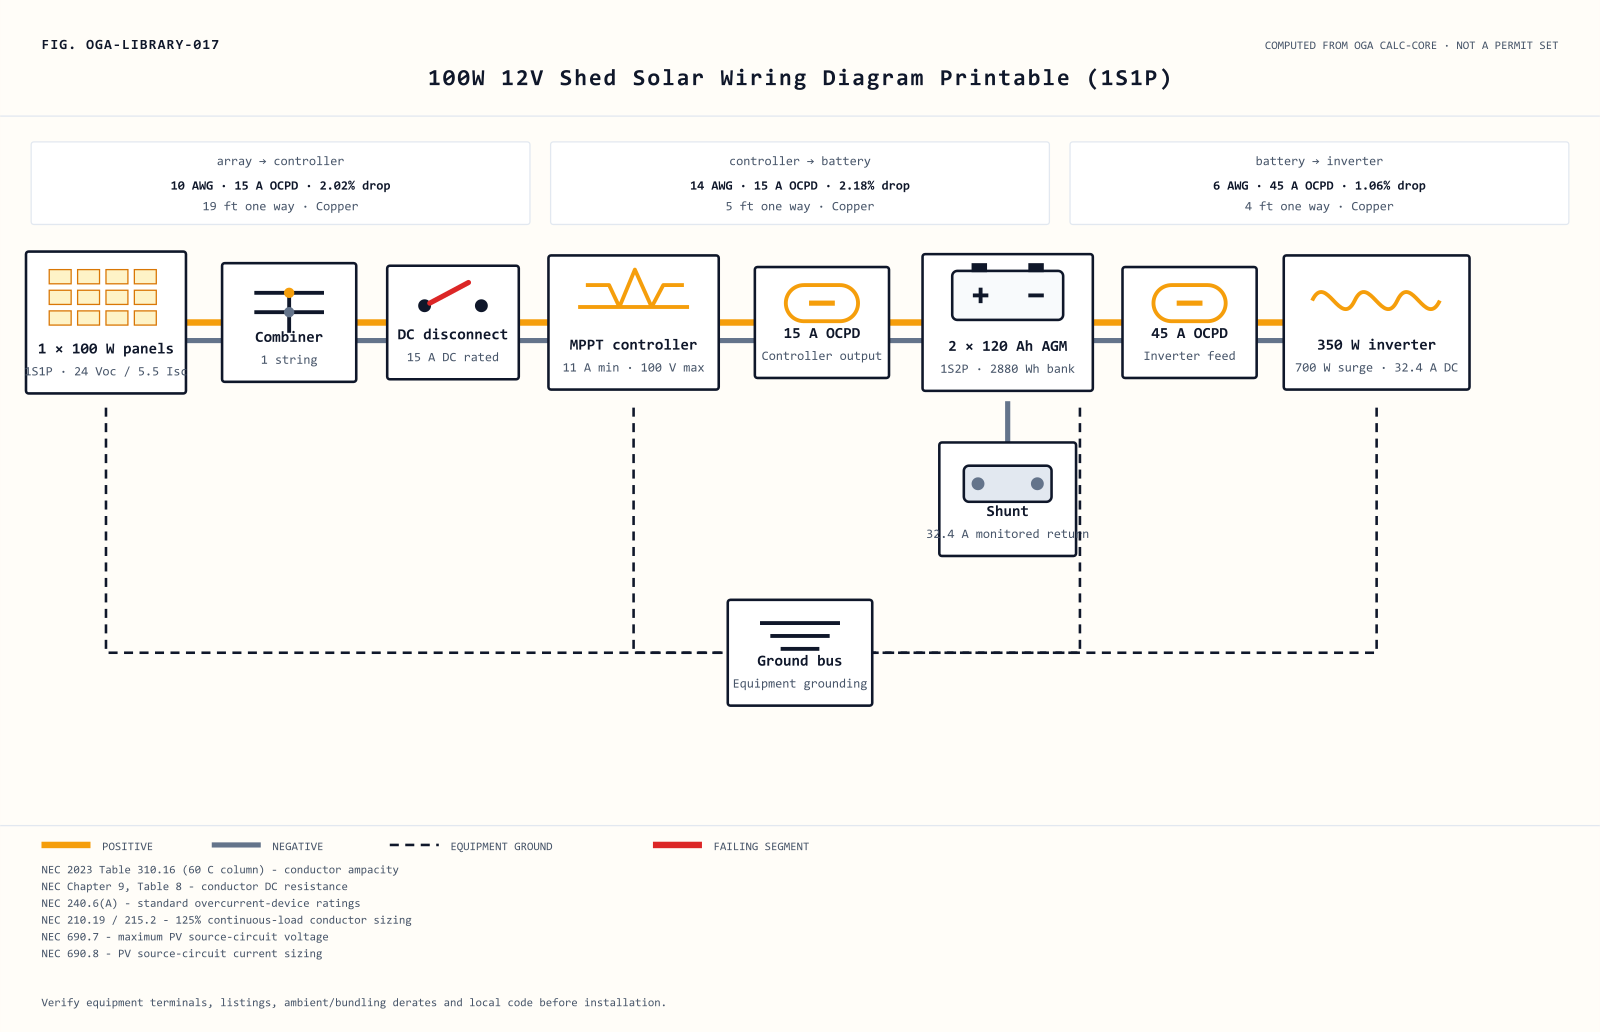
This shed drawing starts with 1 × 100 W modules and ends with a protected 350 W inverter feed. Between those points, the 100W 12V Shed Solar Wiring Diagram Printable (1S1P) preserves the exact 1S1P topology and 12 V bank selected in the catalogue. The drawing and schedules are regenerated from one shared system object to prevent labels from drifting apart.
Controller sizing follows two separate limits in this shed configuration. Power conversion calls for 11 A or more at the battery side, and cold-array allowance raises the PV check from 24 V nameplate Voc to 30 V. The selected MPPT envelope is 30 A and 100 V.
On the first two protected runs, the schedule pairs 15 A with 10 AWG copper and 15 A with 14 AWG copper. The corresponding one-way distances are 19 ft and 5 ft, producing 2.02% and 2.18% drop. These values assume the stated conductor material and do not include unverified ambient or bundling derates.
For storage, the computed arrangement is 1S2P, assembled from 2 × 120 Ah AGM batteries. Series connection establishes the 12 V nominal level, while parallel strings bring the bank to 240 Ah. The displayed 2,880 Wh is nominal capacity rather than a promise of daily usable energy.
The inverter contributes 32.4 A of continuous DC input at the engine’s efficiency assumption. Over a 4 ft one-way cable path, 6 AWG copper and a 45 A protective device keep calculated drop at 1.06%. Its 700 W surge label is recorded for equipment comparison, but the schedule must still be checked against the chosen inverter manual.
This page stays inside the verified engine boundary: every component and conductor currently returns a within verdict. A different panel label, longer run, hotter ambient or changed battery count can alter that result, so follow the customize link rather than scaling the picture by intuition. Local rules, equipment listings and inspection requirements take precedence over this planning aid.
For later comparison, keep the 100 W array, 1S2P bank and the 19/5/4 ft one-way routes together when requesting equipment quotes or an inspection review.
Wire, protection and battery schedules
Wire schedule
| Segment | Design current | One-way run | Computed conductor | Voltage drop | Sizing basis |
|---|---|---|---|---|---|
| array → controller | 8.6 A | 19 ft | 10 AWG copper | 2.02% | 156% of array Isc (NEC 690.8) |
| controller → battery | 8.3 A | 5 ft | 14 AWG copper | 2.18% | controller output at 125% continuous-load ampacity |
| battery → inverter | 32.4 A | 4 ft | 6 AWG copper | 1.06% | inverter continuous DC input at 90% efficiency and 125% ampacity |
Overcurrent protection
| Protected segment | Required ampacity | OCPD | Conductor ampacity | Verdict |
|---|---|---|---|---|
| array → controller | 8.6 A | 15 A | 30 A | within |
| controller → battery | 10.4 A | 15 A | 15 A | within |
| battery → inverter | 40.5 A | 45 A | 55 A | within |
Battery arrangement
| Arrangement | Chemistry | Units | Unit capacity | Bank capacity | Nominal energy | Nominal voltage |
|---|---|---|---|---|---|---|
| 1S2P | AGM | 2 | 120 Ah | 240 Ah | 2,880 Wh | 12 V |
Static routed parts list
Parts are computed from this passing configuration. A route appears only when the verified catalogue record proves every displayed numeric rating; all uncertain matches stay local for verification. Routed links may earn Off Grid Authority a commission at no extra cost to you.
Pre-install review steps
- Confirm the array and controller window: Verify that the 1S1P string plan produces 24 V open circuit and that the equipment is rated above the 30 V cold-design value.
- Lay out the protected DC runs: Measure the one-way paths before ordering cable, then compare them with the computed 19 ft, 5 ft and 4 ft runs shown here.
- Build complete battery strings: Arrange all 2 battery units as 1S2P; do not leave a partial series string in a 12 V bank.
- Commission against equipment instructions: Check polarity, terminal torque, DC interrupt ratings, conductor temperature ratings, ambient correction and local inspection requirements before energizing the 350 W inverter.
Customize or compare
Open the parent build guide for the surrounding design context, safety notes and installation discussion.